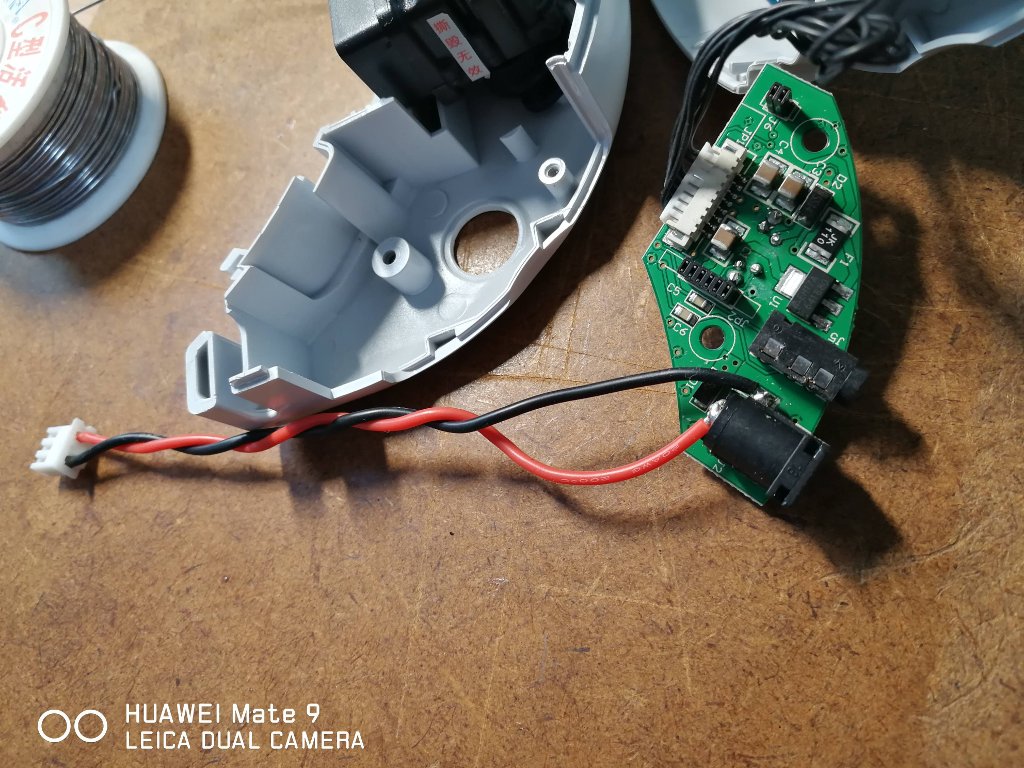
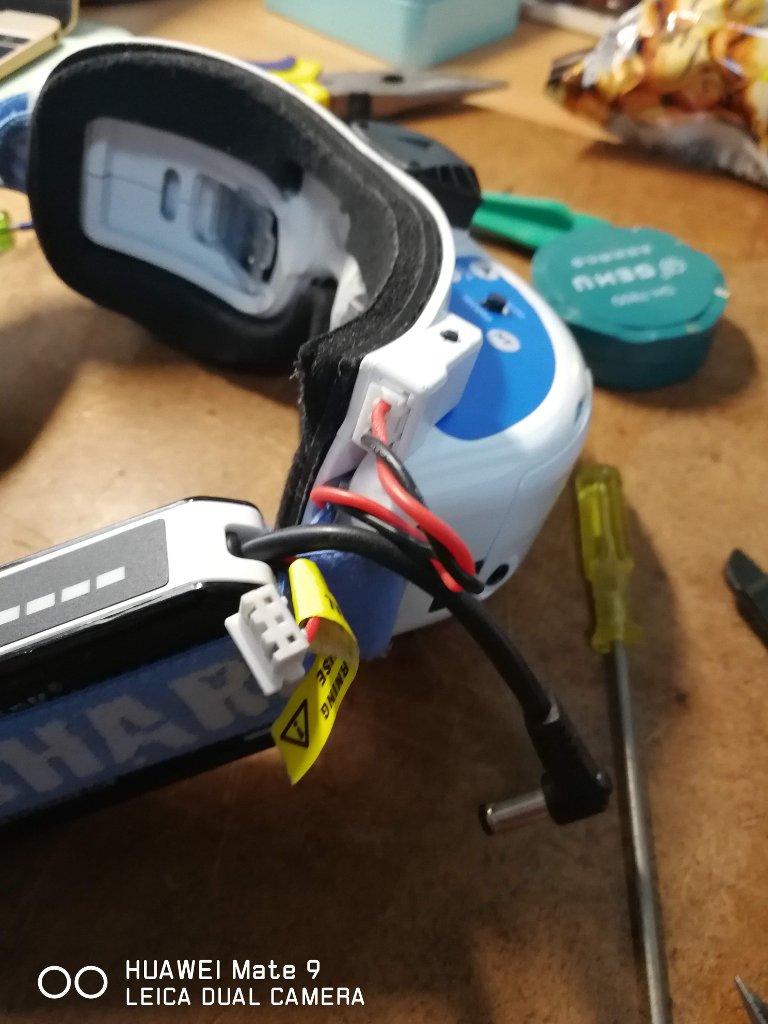
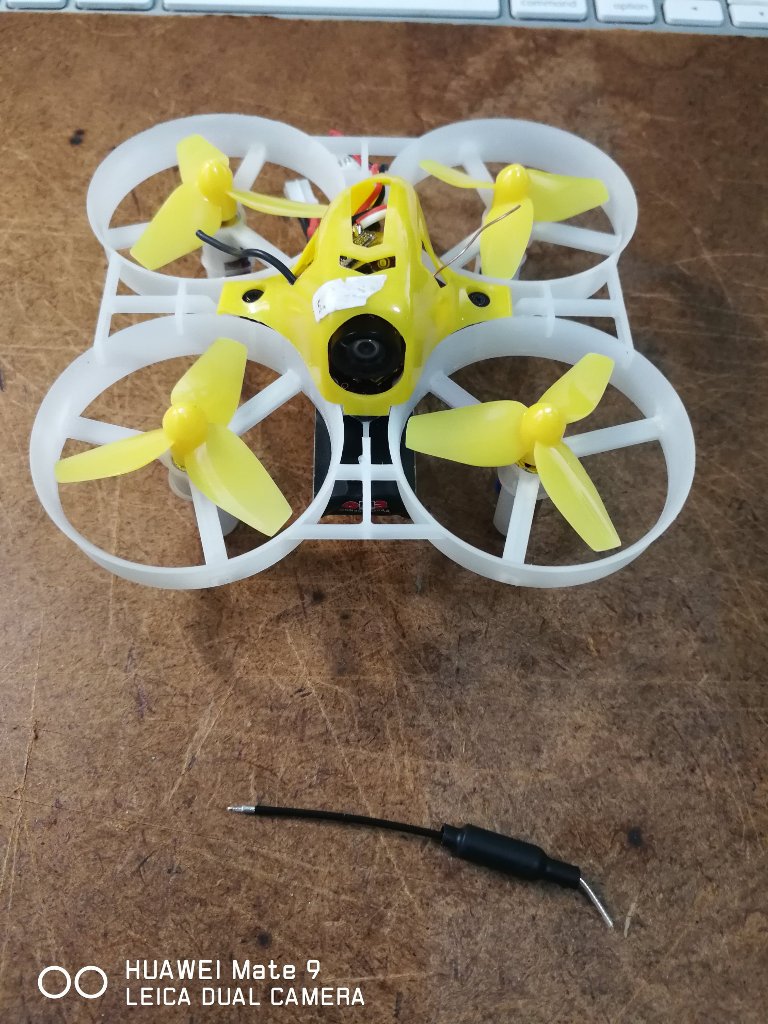
FPV飛行の強い味方FatShark Dominator V3のファンが回らなくなりました。断線した話などを見かけたのでファンの部分をばらしたりしましたが、結局はバッテリーの問題でした。このゴーグルのバッテリーからは二つの線が出ていて、ひとつは本体、もうひとつがファンに接続されます。単純にファンの方のコネクターに電圧が出なくなっていました。バッテリーをばらすのも今一つですし、世間で良く行われている本体の中からファンの電源を分岐する改造を行うことにしました。これは本体の電源コネクターに電源を供給したらついでにファンも回してしまえというものです。本体の許容電圧とファンの電圧が違うため、別々のコネクターになっているようです。2Sのバッテリーを使用する分には共通にしてしまっても問題はありません。外部電源を使用する時は要注意。
VIDEO
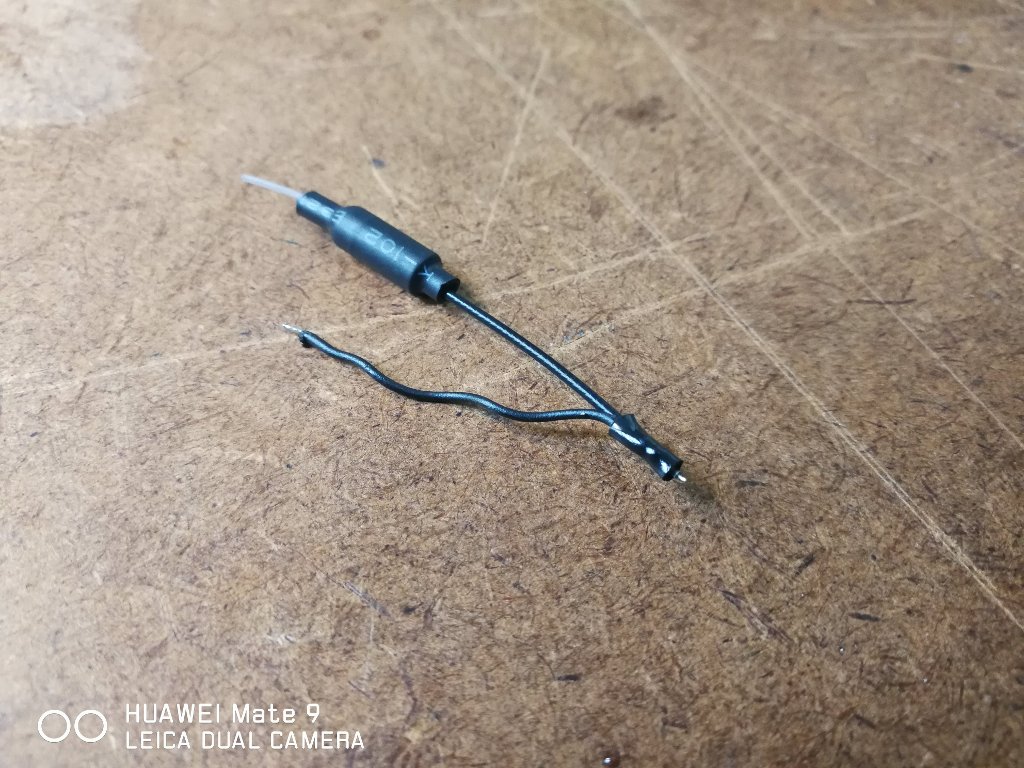
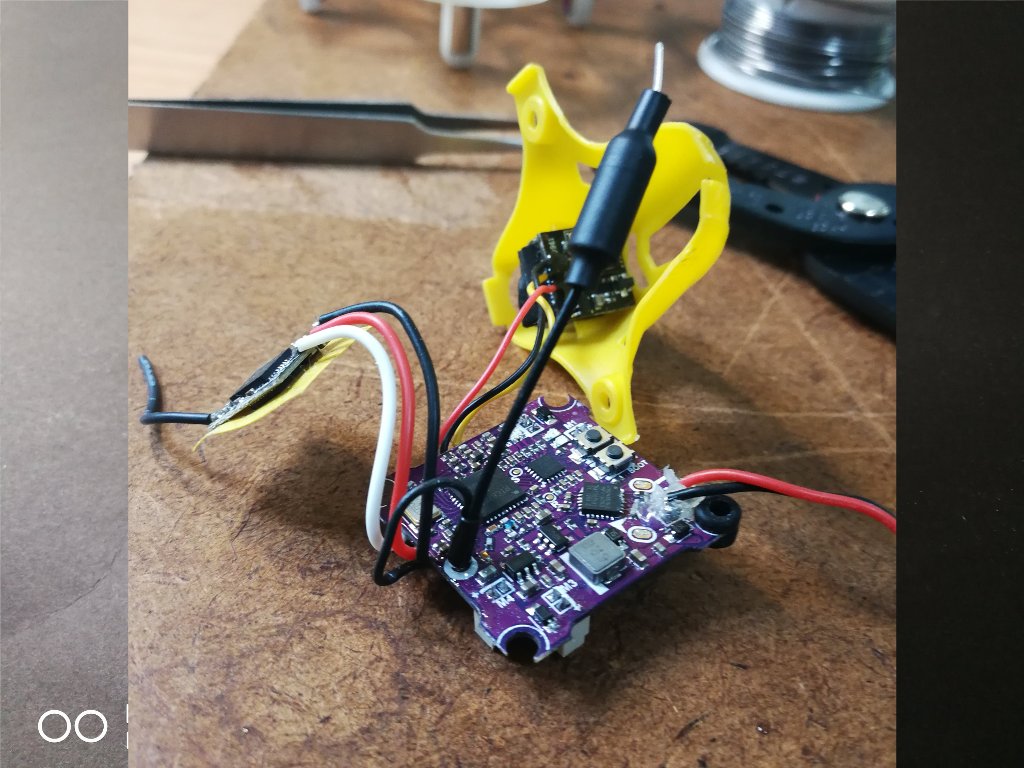
このビデオの主目的は特殊なレシーバーのためのケーブルの埋め込みですが、ついでにファンの電源ケーブルも取り付けています。分解の仕方も良くわかるので、これを参考に行いました。
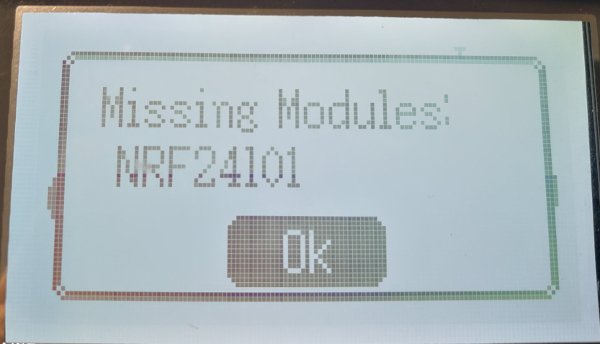
FPVドローンのRC、送信機はWalkera Devo10にDeviationファームウェアを入れたものを使用しています。これ一台でRodeo110と3機あるTinyWhoopすべてを操縦出来るのでとても重宝していますが、突然電波が止まってしまうようになりました。最初は電池が少なくなって電波が止まるのかと思っていたら、だんだん症状が悪化し電源入れてしばらくすると必ず電波が出なくなるようになりました。ディスプレイには何も異常を知らせるようにメッセージはありません。純粋に電波を発射するRFモジュールの故障のようです。
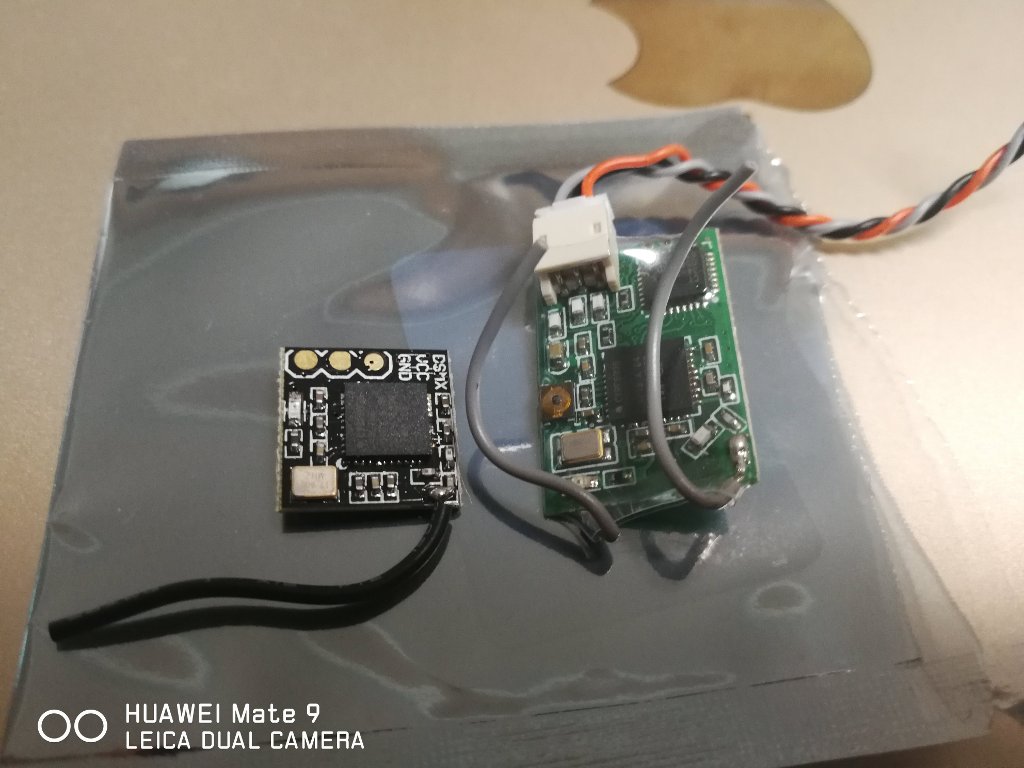
Walkeraから純正のRFモジュール も出ているので中国の通販サイトTAOBAOで探してみましたが、純正品は見つかりませんでした。代わりに四つの異なったRFモジュールが一体になった製品を購入しました。これはDeviationでより多くのプロトコルをサポートするためのものです。いずれ、この改造をしようと思っていたので渡りに船です。
あとはDeviation(v5.0.0)の内部のHARDWARE.INIを編集します。下のようにRFモジュールを使用するためにコメントを外します。(最初は以下のすべての行がコメントアウト(行頭にセミコロンがある)されていました)note: HARDWARE.INIはDEV10のENTを押しながら電源を上げてUSBケーブルをPCに接続すると見えるUSBドライブの中にあります。
[modules]
コメントにあるようにcyrf6936(DEVO10のオリジナルRFモジュール)の部分はコメントを外さなくても認識されます。残りのa7105, cc2500, nrf24l01のコメントを外して起動したところ、nrf24l01のモジュールが見つからないというメッセージが出て立ち上がらないのでコメントアウトしました。購入したモジュールの故障か、Deviationのバージョン、はたまたハードウェアの改造に足りないところがあるのか、今のところ不明です。とりあえず現在のところ必要はないので、そのままにしておきます。
これでCYRF6936, A7105, CC2500と3個のRFモジュールが使えるようになり使用できるプロトコル が増えました。
手持ちのレシーバーで今まで使用できていなかったFrSkyで構成してうまく動作することが確認できました。当然、今まで通りDSMXもDevoも使用できます。
Kingkong/LDARC Tiny7の調整も落ち着いてきて、FPVでの室内飛行練習再開しました。しかしながら電波の飛びが操縦系、FPVとも良くないので家の中でさえ電波を失ってしまいます。Induxtrix FPVだと、まったく問題なく家の中をどこでも飛び回る事ができます。ということでTiny7の改造です。
[ レシーバー ]
[ FPVアンテナの交換 ]
いつも通りの設定にOSDとブザーが増えただけと思ったら、色々と新しい体験がありました。
[ レシーバーの設定とバインド ]
バインドのやり方は特別ではありませんがDMSXのバインドをコマンドだけで行うのは初めてでした。以下、手順です。set spektrum_sat_bind=9を投入、続いてsaveを投入set spektrum_sat_bind=0を投入、続いてsaveを投入
[ OSD ]
[ ブザー ]
[ Betaflight configuration ]
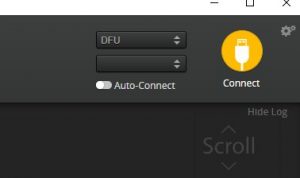
[ ファームウェアのアップデート ]
OMINIBUSはTiny7で使用していたSPACINGF3とは違ってBOOT/DFUモードでファームウェアを書き込む必要があります。ImpulseRC Driver Fixer Tool をBOOTモードでUSB接続した状態で実行したらDFUドライバーが導入出来ました。詳しくは参考にした「FPVドローラボ 」さんをご覧ください。
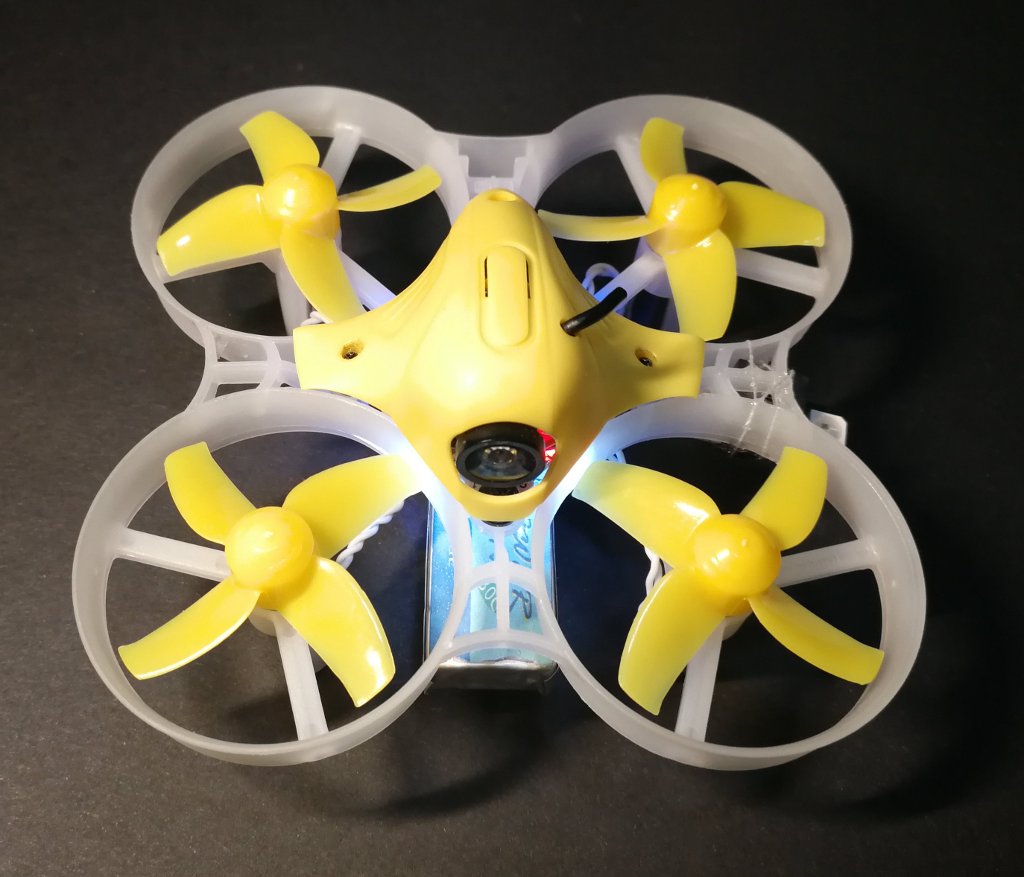
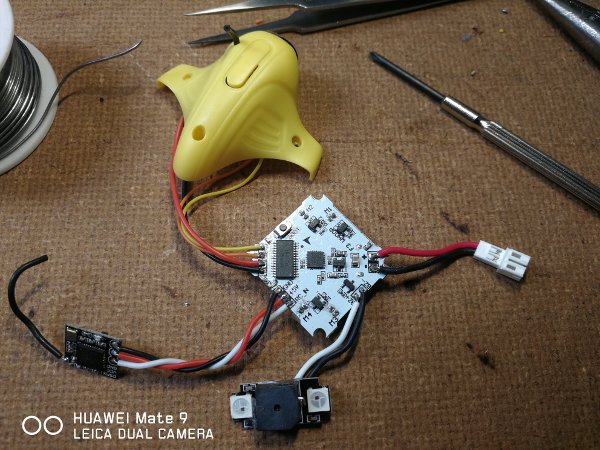
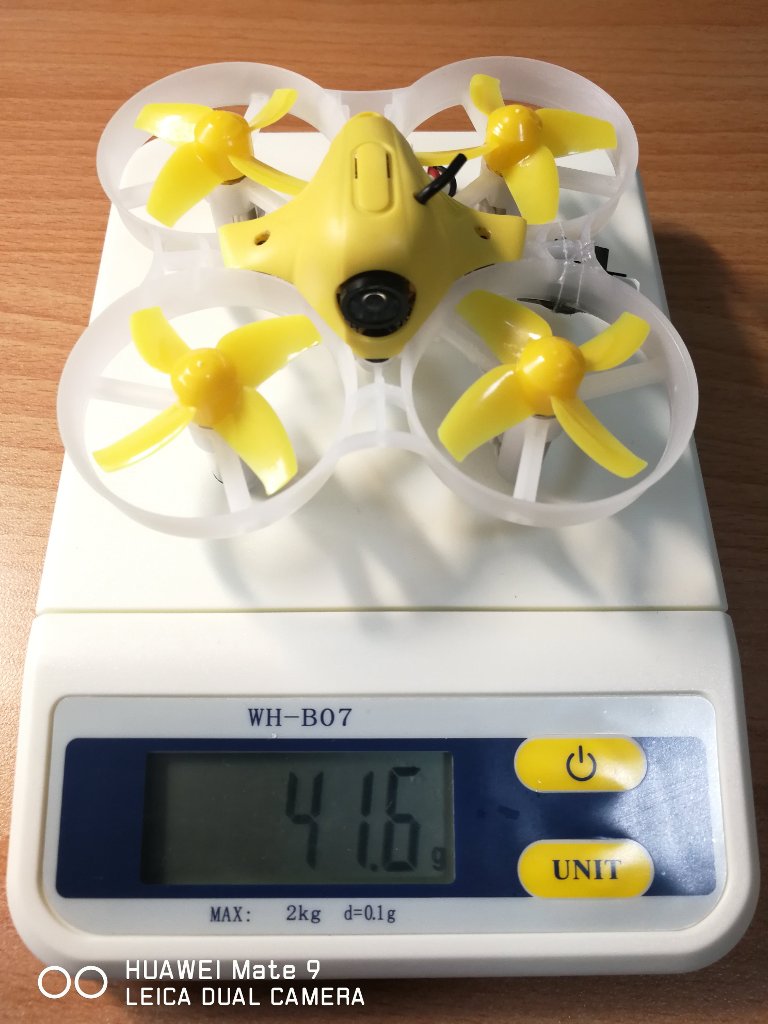
Inductrix FPVから始まってTiny7とTinywhoopの面白さにハマっています。Tiny7の改造から始まって気がつくと全て自分で選んだパーツの組み合わせで一台出来上がりました。いわゆる自作機ですが、パソコンの自作と同じで部品を組み合わせただけなので、どうも自分では自作と言いにくい。どんな物が出来上がったかパーツリストの覚え書き的に書いておきます。
[ 目標 ]
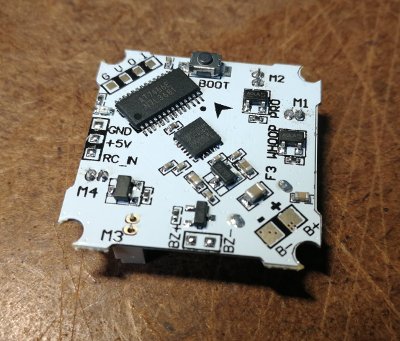
[ FC ]
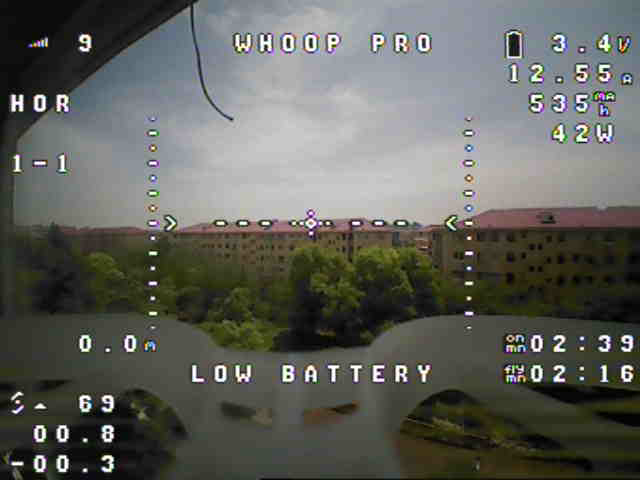
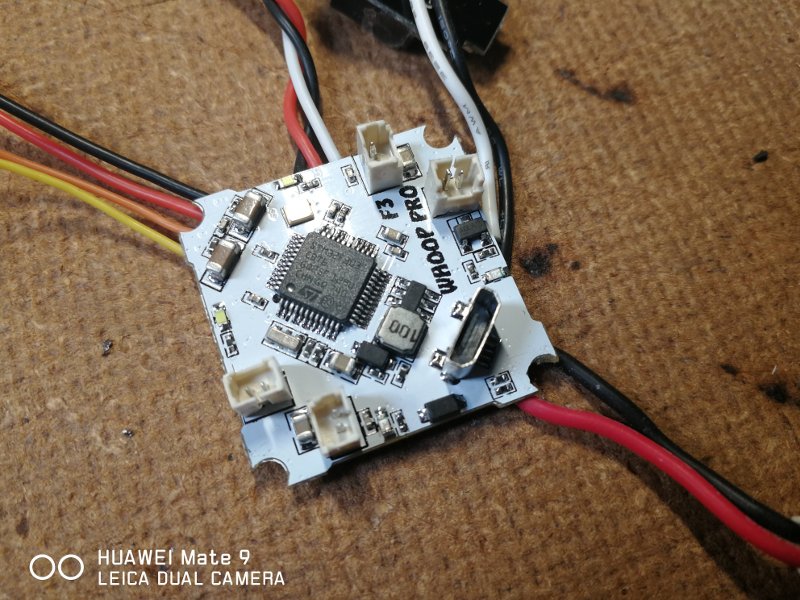
F3 Whoop Pro Brushed Flight Controllerという白い基板のFCを見つけたのが新しいTinywhoopを組むきっかけです。OSDとブザーのサポートがあります。OSD(On Screen Display)は飛行中に様々な情報をFPV画面で確認出来るものです。
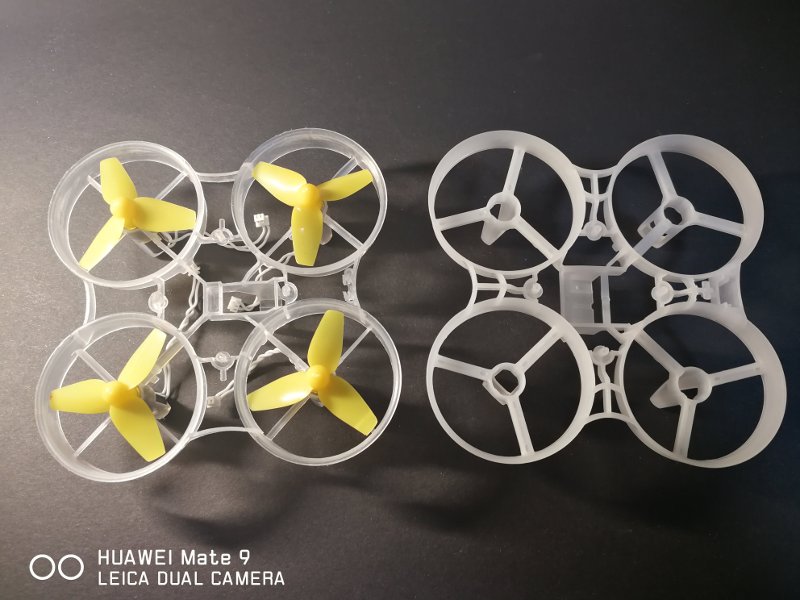
[ フレーム ]
[ モーター ]
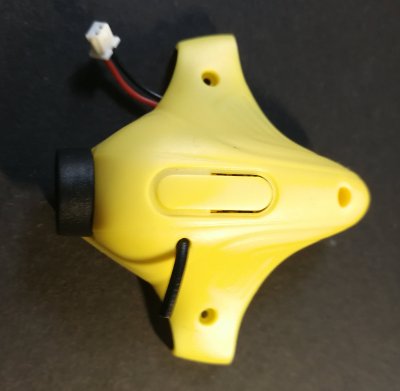
[ カメラとVTX ]
[ 受信機 ]
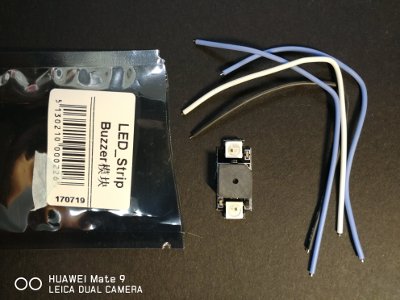
[ ブザー ]
[ 配線 ]
[ 重量 ]
トイドローンTelloを入手してまる3ヶ月、公式サポートされたゲームパッドGameSir T1dの出荷が始まりやっと完成した感があります。ここで改めて私のTello使用環境やレビューのまとめをしておきます。
[ ジョイスティックで飛ばしたい ] VIDEO
[ GameSir T1d Setup ]
[ 電波の飛び ] VIDEO
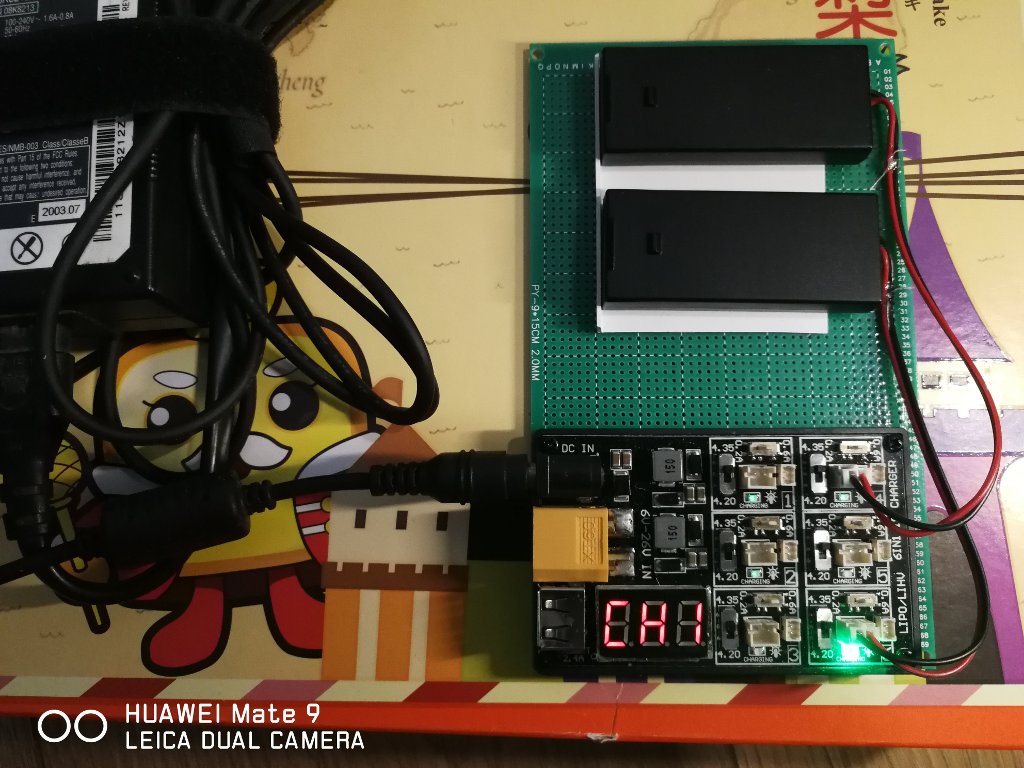
[ 追加バッテリーと充電器 ]
純正の充電ハブも出ました!
[ 写真と動画 ] サンプル写真 は過去記事をご覧ください。
[ FPVフライト ] VIDEO
[ プログラミング ] 以前の記事 をご覧ください。Drone Blocks iPhone, iPadアプリケーションでScratchのような方法でTelloのプログラムが出来ます。特別なセットアップとか無いのでScratchより手軽です。TelloだけではなくDJIのドローンもプログラム出来るそうです。Tello Scripts Manager Androidのアプリケーションです。特徴は、このプログラムから実際に飛行させたログがそのままスクリプトとして使えることと、複数の携帯電話をBluetoothで接続してスクリプトのコピーや同期動作が行えることです。
Inductrix FPVに比べてTiny7が飛ばしにくいのでBetaflightでRateなどを弄ってきました。色々と関連情報を探すうちに行き着いたのがProject Mockingbird です。BetaflightをTinyWhoop用に最適化するためのプロジェクトで、まさにInductrixのFCでの飛びを実現するためのものです。 #TinyWhoop について多くの情報を発信している人たちは、みなこのMockingbirdについて語っているくらい重要な設定と言えます。
手順はドキュメントに従うだけですが、自分の設定に合わせた部分もいくらかはあります。ドキュメントと違う設定を行ったところだけ書いておきます。
– PROFILE 2 (Angle)
– FILTER
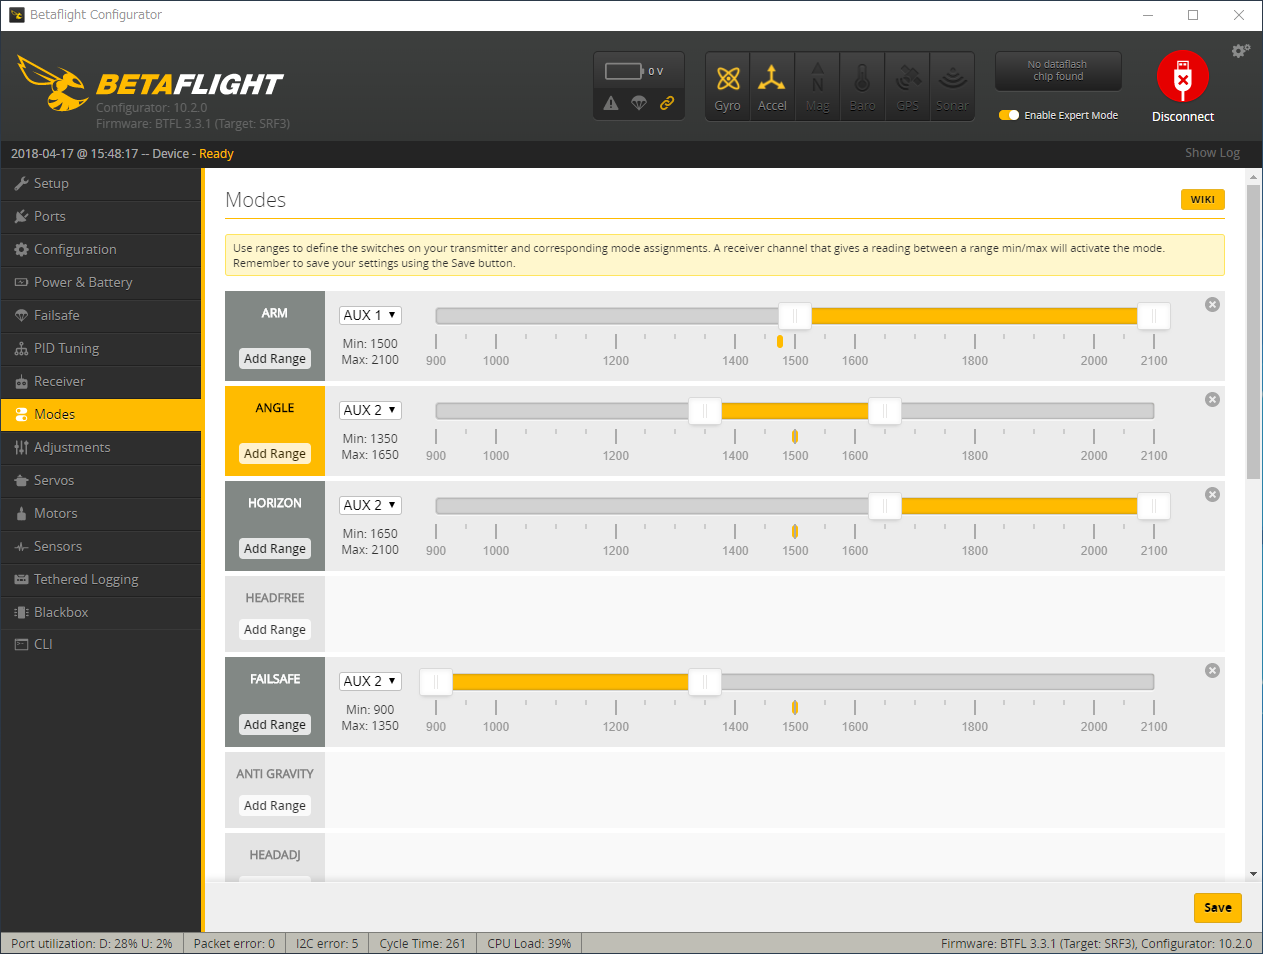
ModesとかAdjustmentについては以前からの設定 を使用しています。
ステップ2として送信機でスロットルのミキシングを行うようになっています。これはエルロンとエレベーターをきった時に自動的にスロットルを連動して上げるように送信機のミキシングを設定するものです。文書ではSpektrumの設定が書かれていますが、わたしはDEVO 10にDedviationファームウェアを入れて使用しています。これについては、下のYoutube Videoに詳しく書かれています。
VIDEO
おおまかなステップを覚書として書いておきます。
実際に飛ばしてみると、別の機体かと思うほど良くなりました。目視だと室内でヌルヌルと自由自在に飛ばせます。FPV飛行はまだ慣れなくてInduxtrix FPVほど自由な飛行が出来ていません。腕の問題だとは思いますがカメラの性にしたくなりつつあります(カメラ換装の予告?)。あと、フリップもTiny7の既定値では、高度の取れる屋外でしかうまく行きませんでしたが、室内でも出来るようになりました(腕の問題も有って成功率はまだ高くはないです)。
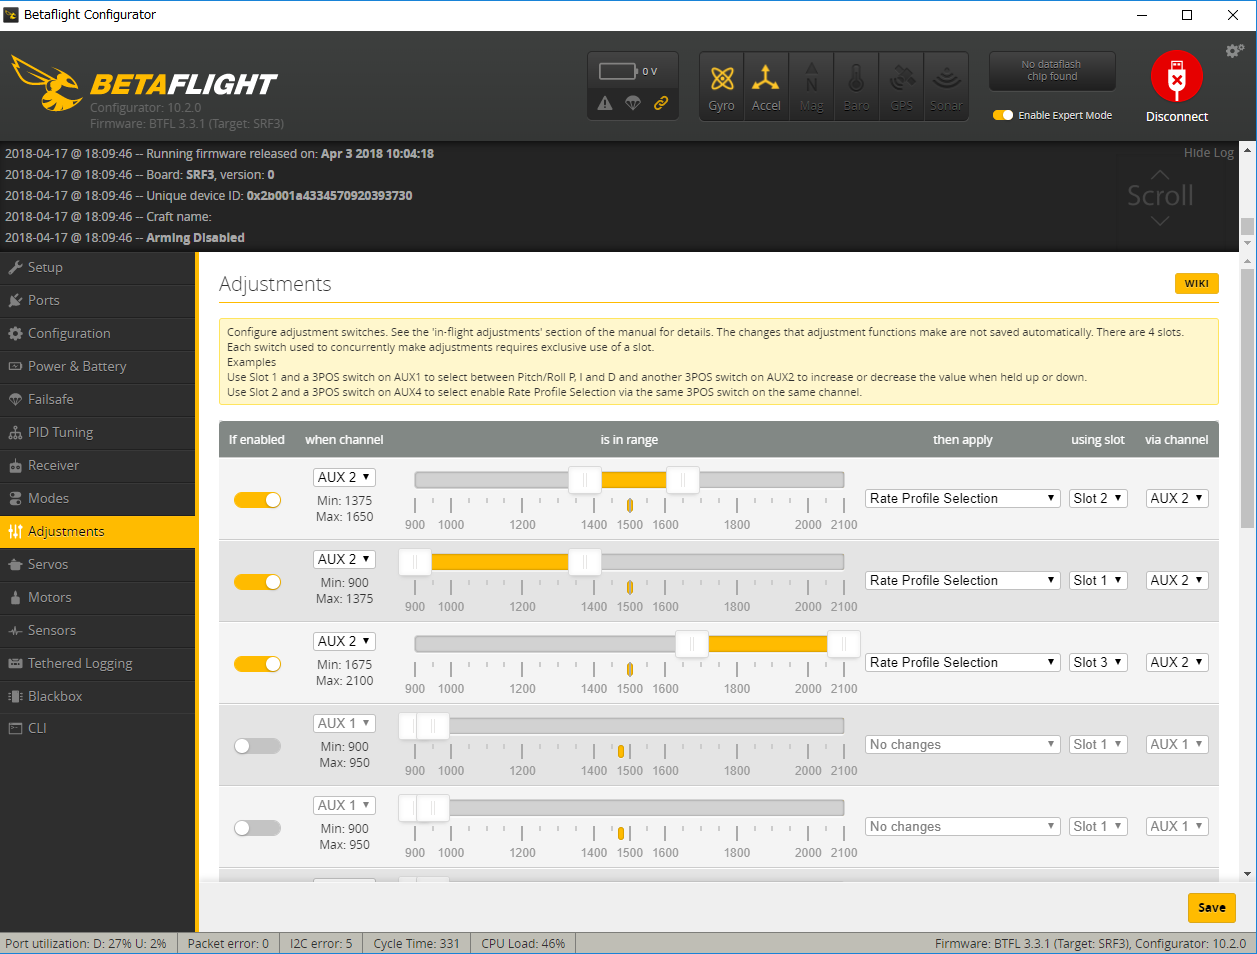
引き続きTiny7の構成に挑んでいます。Rateの値をAir/Horizon/Angle、それぞれのモードで変更したいと思います。これにはBetaflight Configuratorの右上にある”Enable Expert Mode”をオンにすると現れるAdjustmentページで設定可能です。ところが、わたしのTiny7では今ひとつ効いているのかどうか良く分かりません。
ということでFirmwareの更新から初めます。まず最初にCLI DumpとDiffを取得しておきます。
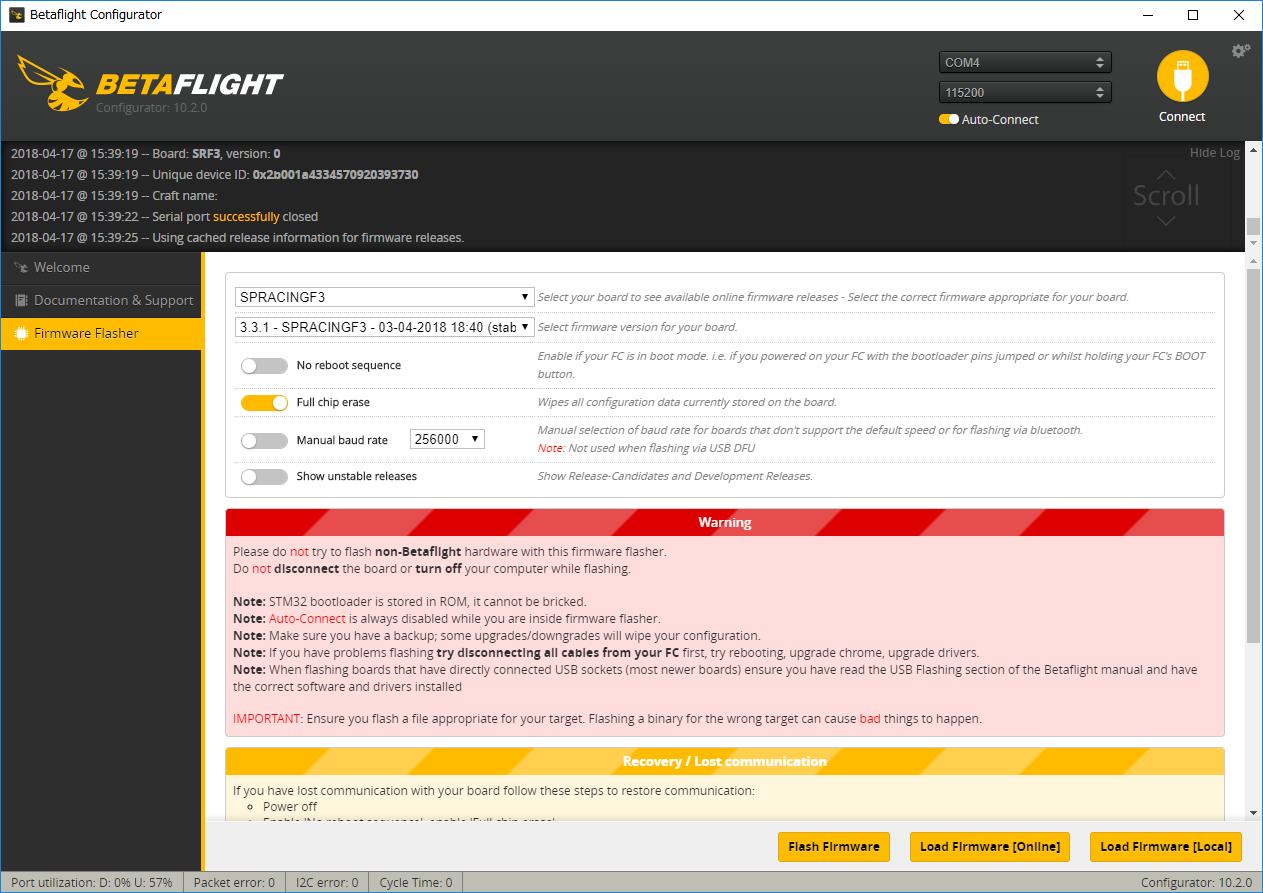
2018年4月現在の最新バージョンは3.3.1 です。ファームウェアのページを見ると沢山の種類があります。何を使えば良いかは、Tiny7の現在のファームウェアバージョンを調べると分かります。CLIページに行きversionコマンドを入れると、# version
と表示されます。これでSPRACINGF3を入れれば良いと分かりました。オプションはNo reboot sequenceをオフ、Full chip eraseをオンにしないと更新出来ませんでした。
更新後、設定が失われていますので、以前のCLI Dumpをリストアします(Diffでも良かったかも)。その後もModesの内容などは再設定が必要でしたので、注意深く設定を確認します。わたしの場合Modes画面でAir modeの代わりにFailsafeが設定されていました。
本題のAdjustmentは以下のように設定しました。
これでRCを接続した状態でPID画面を開くとAir/Horizontal/Angleを切り替えるのに合わせてProfileも切り替わりますので、各モードに合わせたRate値を設定します。わたしの目標としてはAngleは舵の効きを甘くして、他のモードはディフォルトに近い状態で飛ばすことにしました。
2020/03/30更新) 上のAdjustmentの構成は、当時のBetaflightではなんとなく動いていたというだけでBetaflightバージョン4では動作しません。「Betaflight 4.1でRate Profile Selectionが効かなくなった 」をご覧ください。
前回の構成 で屋外でがんがん飛ばしています。3Dも出来ます。
VIDEO
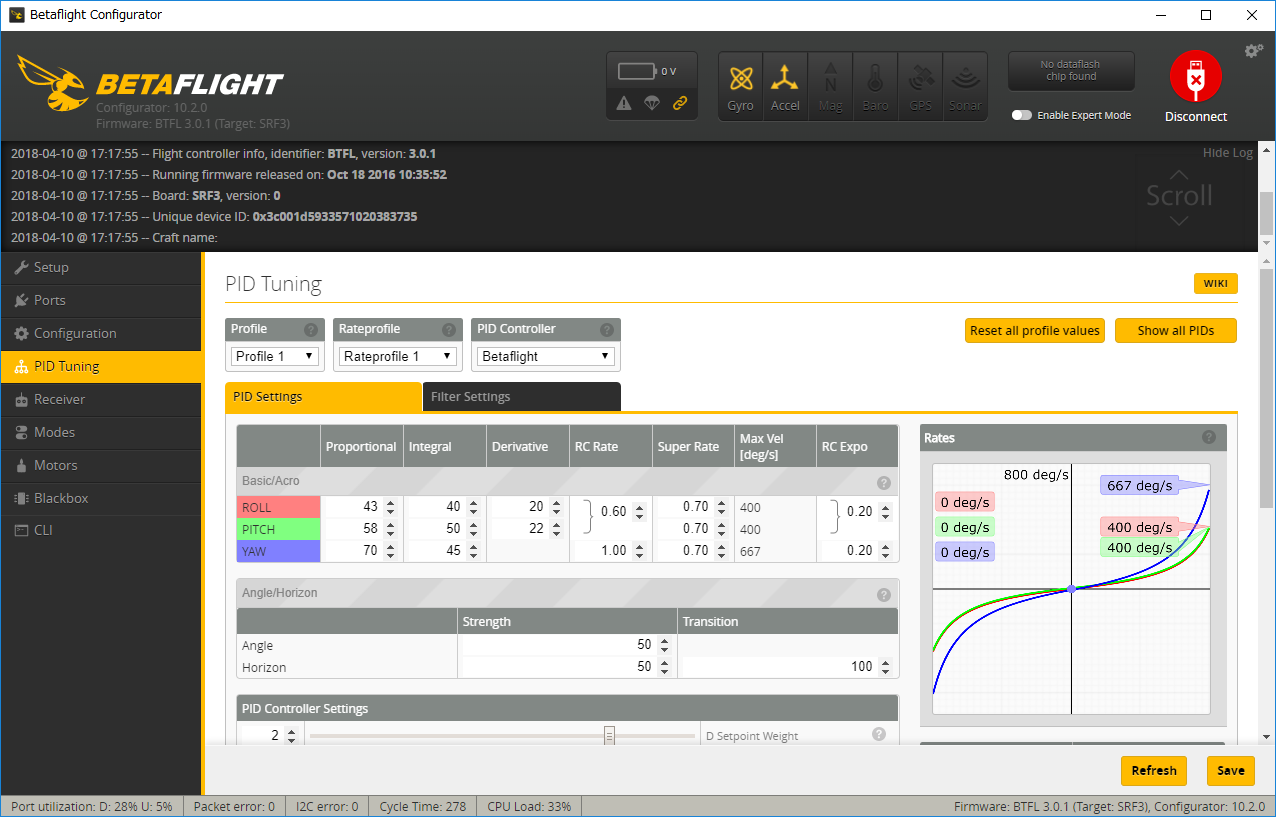
ただ室内では舵が敏感過ぎて飛ばしづらいです。そこでBetaflightのRateを調整することにしました。良く分かってはいませんが、RC Rateで全体的な効き具合(数字を大きくすると舵の効きが良くなる)、Super Rateでスティックを大きく倒したところの効き具合、RC Expoでスティックのセンター近くの効き具合(数字を大きくすると効きが弱くなる)感じだと思います。右側にスティックの効き具合がグラフで表示されるので、それと実際の飛行テストで調整します。
屋外で3Dをするための機体は、若干RC Expoを足しただけです。室内専用の機体では、上のようにしてみました。もうちょっと緩くしても良いかもです。あとThrottle MID(Throttleの中間値、40%でホバリングあるいは一番よく使う位置、ならば0.40と指定)、Throttle EXPO(数字を大きくすると、中間値の付近の効き具合が緩くなる)も弄っていますが、今一つ設定を絞り込めていません。
追記) さらに効き具合を緩くして、室内専用機は下の設定にしました。これでも室内なら十分に機敏に動きます。屋外でも試してみたいです。
RTF(Ready to Fly)で送信機セットを購入すれば手間なしですがBNF(Bind and Fly)ですといろいろと設定を行わないとプロペラを回すことさえままなりません。そこでいつも通り自分への覚え書き的に手順を書き残しておきます。
一番大事なのは最初にTiny7の初期設定を保管しておくことです。どこをいじったか把握しているにもかかわらず不調になることもありますので、設定画面を開くより先にバックアップします。画面のボタンでバックアップというのがあるので、それも取得しましたが、結局のところCLI DUMPというものが必要で、それに全て含まれるようです。CLIというコマンドラインの画面でdumpコマンドを実行し表示されたものをテキストファイルに保管しておきます。初期設定に戻すためにはこのテキストファイルの内容を一気にCLIのコマンドラインにコピペし、saveコマンドを実行すればOKです。実際、これに何度救われたことやら。
まずはRC(送信機)とバインド出来ないと話になりません。Tiny7は色々な種類の受信機に対応しています。わたしは送信機に組み込み済みのプロトコルに合わせてDSM2/DSMX受信機を購入しました。わたしのTiny7側の設定は初期設定のままでDSMXプロトコルで接続出来ていました。バインドはスイッチ付きの受信機なので、スイッチを押しながら電源をいれればバインドモードに入るので簡単です。
接続出来ていることは受信機のLEDで分かりますがBetaflight のReciever画面で確認するのが確実です。ここで各スティックの動きやスイッチの動作が確認できます。
このままでは受信機は機能しているのにスロットルを上げてもプロペラが回りません。色々調べていくと、どうもARMというスイッチの設定が必要なようです。これには送信機側でスイッチを使うための設定が必要です。わたしはDEVO10という送信機にDeviation というファームウェアを入れて使用しています。この設定がなかなか難解です。幸いなことにDeviation Forumにiniファイルがアップロードされていましたので、それを使わさせて頂くことにしました。
KingKong Tiny7 DSM2 Devo F12E
最初の投稿に添付されているファイルを使いました。これはDSM2用なのでプロトコルをDSMXに変更、あと各舵の可動範囲も若干調整しましたが、そのままでも大丈夫です。あと設定templateの読み込みはresetした状態から行わないと、それまでの設定が残ってしまい期待通りにならないこともあります。
再びBetaflightのReciever画面に戻りスイッチの動きを確認します。使用するスイッチは送信機の左上のスイッチと右上にある3ポジションのスイッチです。動きが確認できたらMode画面で四つのステータスに割り付けます。この方法については以下のYoutubeビデオの最後のところがよく分かりますので参照ください。
Kingkong Tiny 7 RTF Quick Review Plus Betaflight Setup For Horizon and Air modes
これで飛行準備完了です。電源を上げ、スロットルを一番下にしてARMスイッチをオン。後はスロットルを上げれば飛行開始です。
AIR MODEやHORIZONにて本格的に宙返りなどのアクロバットを行う場合には舵の効きを最大にする必要があります。これには送信機の設定とBetaflightの両方を調整します。
Deviation側の設定は以下のYoutubeビデオの2:40から3:20(1-4までで5-GEARからは触らない)までをご覧ください。How to set up a DSMX receiver in Betaflight and binding to a Devo 10 with Deviation
Betaflightの設定は以下のYoutubeビデオ(ビデオではCleanflightですが)の8:15から13:30を参照してください。How to Bind Eachine Micro Quad to Spectrum Radio – Binding Micro Quad to DX9, Dx8, Dx6
rxrange 0 1073 1925
rxrange 1 1073 1925
rxrange 2 1073 1925
rxrange 3 1000 1855